Firewall bypass: Encapsulating traffic inside UDP
On our last post about UDP hole-punching we learned how we could use UDP traffic to exploit the stateful nature of firewalls, thus bypassing blocks for incoming connections. That was a fun exercise, but of limited use in the real world.
On this post we’re going to turn it up a notch and encapsulate other IP traffic inside a UDP stream. The goal of this exercise is to be able to establish seamless TCP connections between two hosts that have all TCP traffic blocked between them.
Blocking TCP access to and from our VMs
I’ve modified the NSGs we had on the previous post to block all inbound and outbound TCP traffic, except 22/TCP inbound for management purposes. Click on the images below to see them in detail.
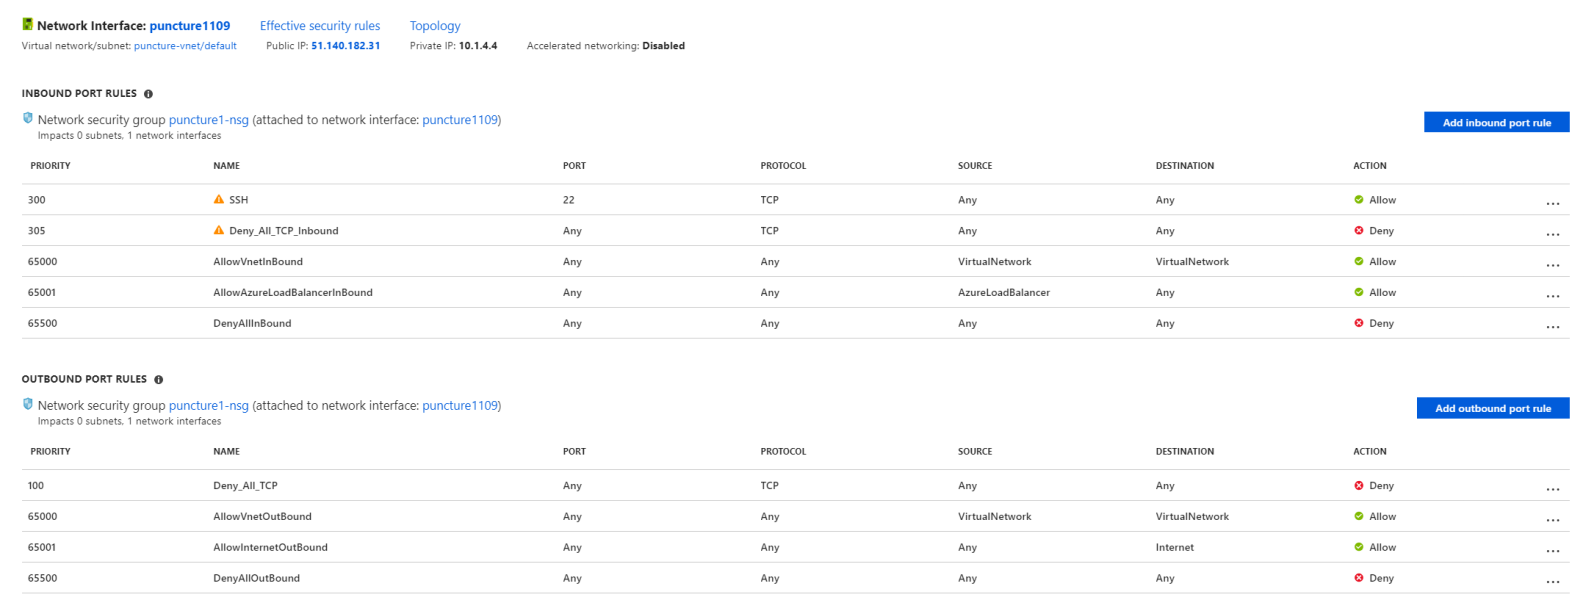
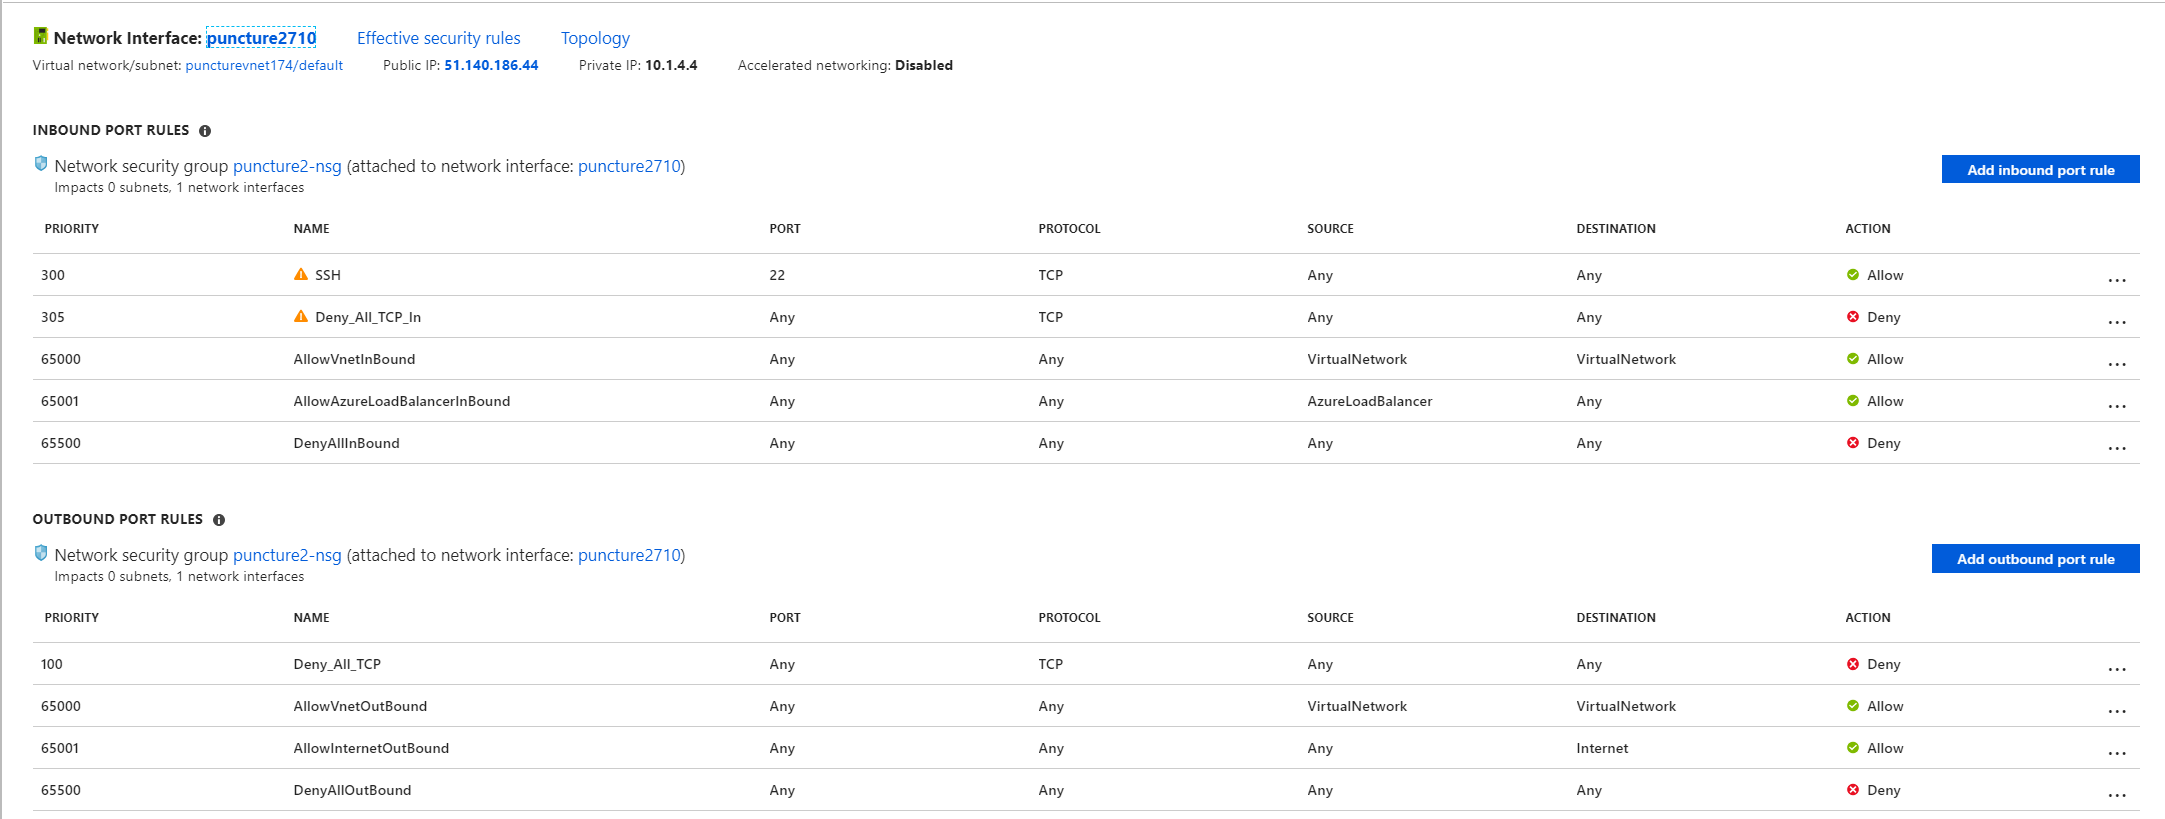
The above rulesets will block any TCP traffic coming in to the VMs or leaving the VMs. Again as NSGs are akin to a stateful firewall, the rules are checked for SYN packets. If a SYN packet can’t traverse the NSG layer on either direction there’s no way we should be able to establish a TCP connection between these two VMs… Or is it? 🙂
Encapsulation
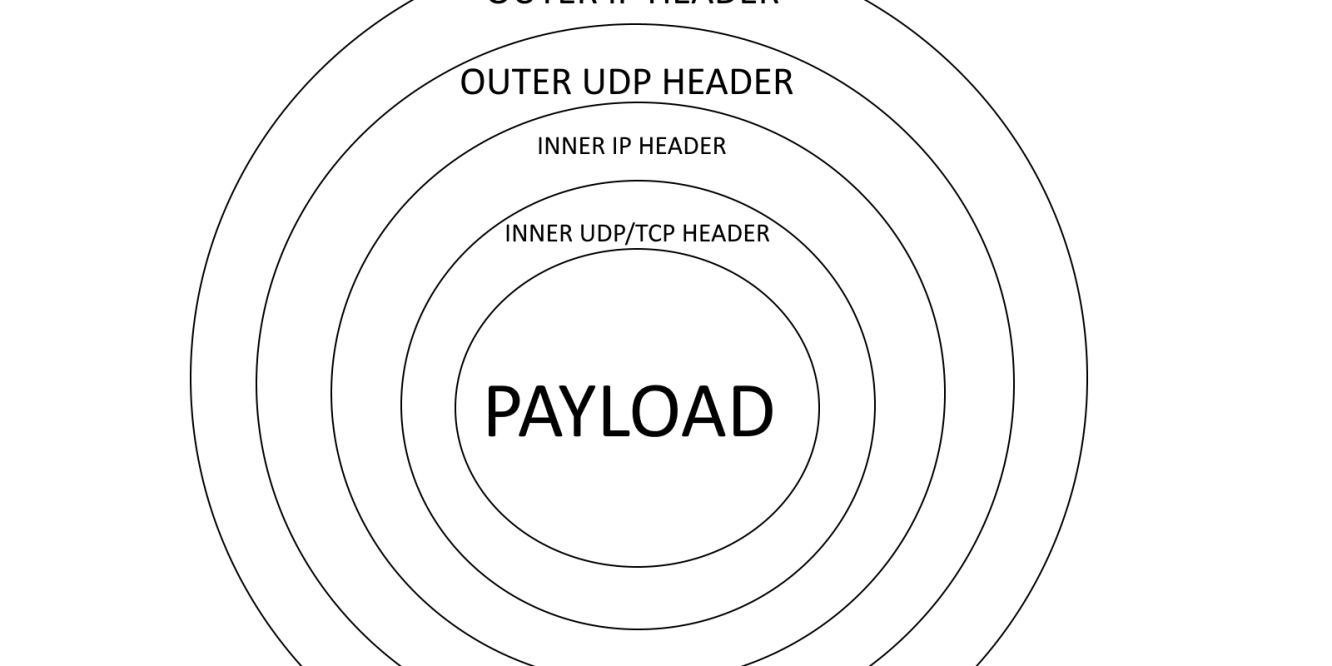
NSGs are just a stateful firewall layer, they don’t do deep packet inspection nor they try to understand what’s the layer 7 protocol used. They just look at the layer 4 headers and match those against the defined rules. This plays to our advantage in this scenario as we’re going to encapsulate TCP traffic inside an extra layer of IP and UDP headers. The NSGs will look at the outer IP and UDP layer, thus ignoring what’s really inside the packet.

As you can see in the figure above (please excuse my humble Paint skills), the approach could be compared to peeling an onion where NSGs will only look at the first IP (layer 3) and first UDP (layer 4) headers. The goal is to use the outer headers to bypass NSGs, then peel them off before delivering the traffic to the destination application.
Of course we’re going to do this by writing a simple Go tool.
Firewall bypass
The firewall bypass technique is UDP hole-punching as explained on the previous article, which implies both sides sending and receiving UDP traffic on the same port pair (src, dst). I would recommend making a pause here to read the linked article if you’re not familiar with UDP hole-punching.
We will use those UDP streams to encapsulate all traffic between the two peers, thus effectively offering full communication between two Azure VMs that have all TCP traffic blocked and all UDP inbound traffic blocked.
Making it seamless
One of the challenges of this exercise is to make it look as if the two involved peers were talking to each other in the same subnet. In order to do this one of the first requirements I had was to create a new interface on each peer. That interface will be part of a virtual network that will only exist inside the UDP-encapsulated tunnel.
We will use Linux’s TUN interfaces as it’s an industry favourite. We also have decided on the below IP settings for the virtual network:
Network definition:
10.111.111.0/30
VM1’s IP address:
10.111.111.1/30
VM2’s IP address:
10.111.111.2/30
As you can see the chosen network is big enough to accommodate two hosts. We could have chosen any valid mask such as /24, but it wouldn’t really make a difference unless we either needed more hosts to participate on this virtual network or chose a smaller mask that couldn’t fit more than one host.
Once these interfaces are up and configured inside the OS, all traffic directed to that network will be sent to the TUN interface unless other, more specific, routes have been added in the OS. Once a packet is delivered to the TUN interface our program will read that traffic, add the external UDP layers and send it to the peer’s public IP address on the port pair chosen for UDP hole-punching, which is 10001/UDP in our case.
On the remote side, when a UDP packet is received on source and destination ports 10001/UDP our program read it, strip the outer UDP and IP layers and send it to the TUN interface.
It works the same in either direction.
Effective testing
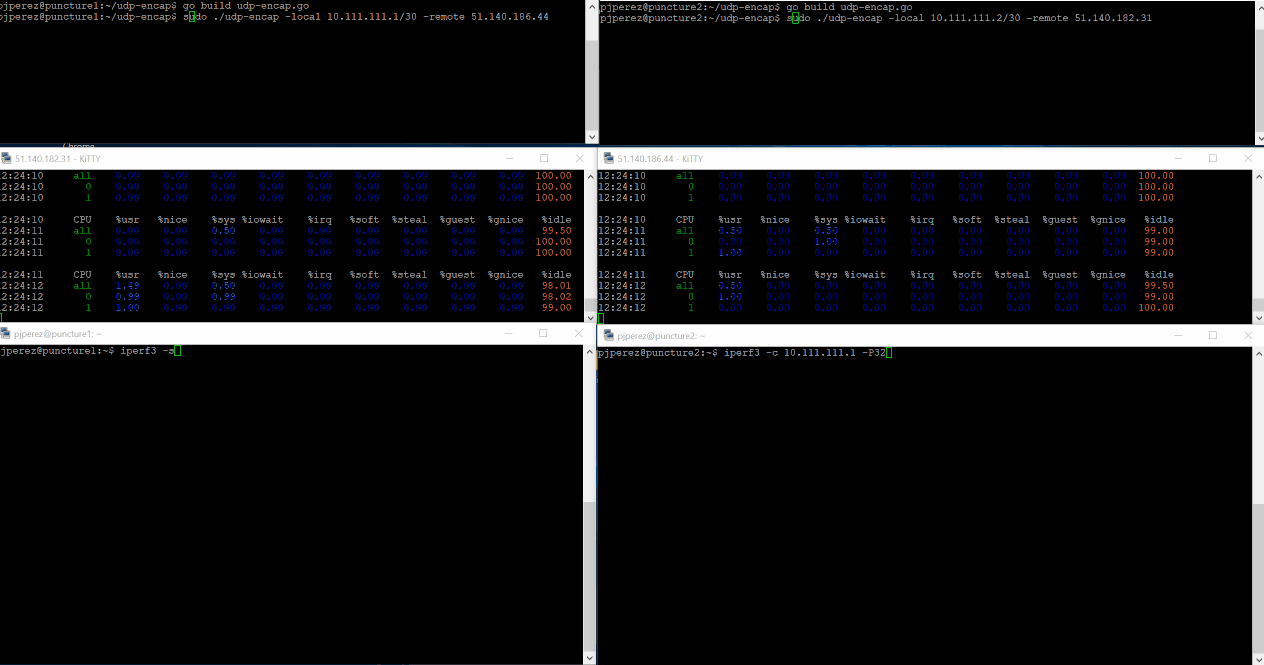
We have chosen iPerf for the TCP tests as it’s a well-known testing tool in the industry. iPerf will be run as server (iperf3 -s) on one of the VMs, thus listening on port 5201/TCP on all interfaces including the TUN interface. This implies that when our tunneling software receives a UDP packet, strips the outer headers and delivers the internal packet to the TUN interface, iPerf will receive that packet as it will be directed to destination port 5201/TCP.
iPerf is a client/server tool, so on the other VM we will run it as client and in order to test how our software works with multiple threads, we will start iPerf3 with 32 threads. This doesn’t imply we should get better or worse performance per se, but considering we’re testing on VMs with 2 cores each I don’t think we’re going to see much gains over a single-threaded connection.
Server command:
iperf3 -s
Client command:
iperf3 -c 10.111.111.1 -P32
Putting it all together
Now that we have it clear how we would like this work, it’s time to put it all together.
This wouldn’t have been possible without Anton Skorochod’s post “using tun/tap in Go or how to write VPN” and its included source code, which is an excellent way to learn the basics of water, Song Gao’s native Go library to work with TUN/TAP interfaces.
The code shown above is a modification of Anton’s for the purpose of writing this article (optional debug, extra/different comments, tuned MTU, changed how we use water as the library has also changed, …).
The program creates a new TUN interface and configures it with the chosen parameters, mainly IP addressing and MTU. The MTU is adjusted to accommodate later the IP+UDP headers. In most scenarios 20 bytes are enough for IP headers, but those could be up to 60 bytes so we’ve been overcautious and reduced TUN’s MTU to 1432.
Afterwards we prepare the UDP connection and start listening on the chosen port.
The main part of the program is the two main loops:
- One for reading the UDP stream, stripping the headers and writing into the TUN interface.
- One for reading the TUN interface, adding the UDP headers and writing into the UDP stream.
The original code also printed to stdout the headers of all packets received on either side (UDP stream or TUN interface), but I’ve turned that off by default due to severe perf issues. You can turn it on by changing the value of DEBUG to true. This is how it will be ran on my test VMs:
VM1:
sudo ./udp-encap -local 10.111.111.1/30 -remote 51.140.186.44
VM2:
sudo ./udp-encap -local 10.111.111.2/30 -remote 51.140.182.31
(It does require elevated permissions to create and configure the TUN interface)
… Aaaaand action!
As promised, we’ve ran iPerf3 over our simple tunnel and as you might have imagined it worked 🙂 you can also see in the gif below the impact on the VM’s CPUs. Click on the image to see it in detail.
Almost 600Mbps average bandwidth between both VMs. Not bad for a connection that wasn’t supposed to happen at all, right? but I’m also sure those numbers can be improved – please add your suggestions in the comments section!
Deep packet inspection, application layer gateway, l7 inspection…
So called Next Generation Firewalls are able to read inside the packets to avoid funny encapsulations and all sorts of clever attacks at different layers. That means our little trick is unlikely to fly in networks where such devices are used as the inner headers are sent in plain text. Maybe we should add encryption? Let’s leave that for future exercises… 🙂